
The CAO will update the Resource Assessment Standalone when completing a Resource Assessment (RA) for an individual who is ineligible for MA.
CREATION OF RA WHEN NO RA RECORDS EXIST
Go to the “Standalone” module in the eCIS menu bar and select “Resource Assessment.”
Before creating an RA, the worker must use the eCIS ‘Resource Assessment Search’ screen to determine if any existing RA records exist for the individual. Workers are required to enter at least one of the following search criteria to perform an RA search:
· SSN
· Individual Number
· First Name, Last Name, and Date of Birth
· First Name, Last Name, and County
· County and Record Number
If known, searching by SSN and Individual Number will provide more reliable search results.
An error message will indicate when no matching RA records are found for the individual and the worker will be able to click the “Create a new Resource Assessment” link.

On the “Resource Assessment Detail” screen, enter the known information about the individual in the “Individual Information” section and then click the “Perform Individual Search” button. “First Name” and “Last Name” are mandatory fields. The search attempts to match the individual information with the Master Client Index (MCI).

INDIVIDUAL IS NOT KNOWN TO MCI
When no matches are found for the individual, the following message will display at the top of the Resource Assessment Detail. The remaining sections of the Resource Assessment Detail unlock.

INDIVIDUAL IS POTENTIALLY KNOWN TO MCI
Input the individual’s known information and then click “Perform Individual Search.”

A pop-up appears which shows the known information entered followed by a list of potential matches. If the Resource Assessment has matched with an individual in MCI, click the “Select” radio button next to the correct individual and click “Save.”
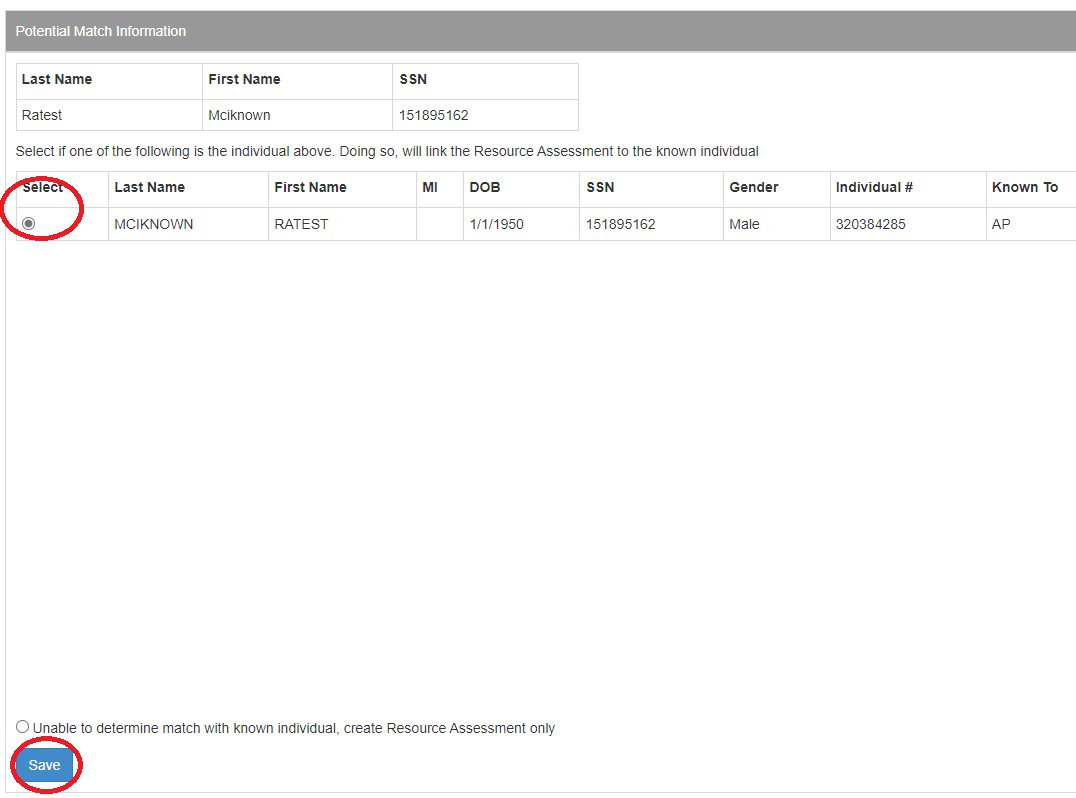
If the Resource Assessment has failed to match an individual in MCI, click the radio button next to “Unable to determine match with known individual, create Resource Assessment only” and click “Save.”
COMPLETING RA AFTER INDIVIDUAL SEARCH
Case Information – enter:
· County
· District
· Record # (optional)
Resource Assessment Information – enter:
· Date of Admission or Assessment for HCBS
· Assessing County
· Assessing District
· Status
· Date RA Completed
· Net Resources
The Protected Spousal Share automatically calculates when the “Net Resources” are entered. “Created By” is prepopulated by eCIS.
NOTE: When the Protected Spousal Share is less than the Minimum Protected Share or greater than the Maximum Protected Share found in LTCH 468 Appendix A, the worker will save the actual Protected Spousal Share first. Then update the RA record to adjust the Protected Spousal Share to the Minimum or Maximum
Community Spouse Information – enter:
· First Name
· Last Name
· Phone Number
· SSN
· Address
· City
· State
· Zip
· County
· District
If not all the Community Spouse Information is known, the worker must check the “Not all information is available” checkbox. Click the “Save” button to save the Resource Assessment.

The following message at the top of Resource Assessment Details confirms that the Resource Assessment was successfully saved.

USING STANDALONE TO UPDATE A RESOURCE ASSESSMENT
Begin by entering the individual’s known information on “Resource Assessment Search” and click “Search.”

Standalone will return associated RA records. Click on “View/Modify.”

On the Resource Assessment Detail Screen, select a “Reason for Modification.” The available reasons for modification are:
· New
· Wrong Individual
· Incorrect Resource Assessment
· Appealed Resource Assessment
· Case Information Update
· Community Spouse Information Update
· Other
When “Other” is selected the text box “If Other, Specify” unlocks and details of the reason for modification can be entered.
In the case of an “Incorrect Resource Assessment,” enter the new “Net Resources” and the new “Protected Spousal Share” is automatically calculated. Click “Save.”


The following message displays at the top of the page.

After changes are made to a RA, the “History” button is available at the bottom of the screen for the worker to be able to view the historical edits made to the RA.

The Resource Assessment History pops up in a new window.

RETENTION AND PURGING OF RECORDS IN RA STANDALONE
At case commit, the system will update individuals from “Pending” to “Active” status who are active on eCIS.
eCIS will also update the status of a RA Standalone record to “Deceased” when MCI is updated with a Date of Death.
RA records with “Active” and “Pending” statuses remain in RA Standalone until the individual turns 125 years old, at which point the RA record is purged.
RA records with “Deceased” status are purged 6 years after the status of the record was switched from “Active” or “Pending” to “Deceased.”
Updated March 14, 2023, replacing March 28, 2017